How to Set Up Voice Recognition on Mac in Under 2 Minutes
Set up voice recognition on Mac in under 2 minutes. Covers built-in macOS dictation and Hearsy — step-by-step with exact settings, shortcuts, and tips for getting accurate results from the start.
Voice recognition on Mac takes under 2 minutes to set up. You have two options: the dictation feature already built into macOS, or a third-party app like Hearsy that runs its own speech model locally. Both work in any app with a text field.
This guide walks through both setups, when to use each, and a few settings that actually matter.
Here's an overview of the two setup paths and what each option offers:
Option 1: Built-in macOS dictation (free, 90 seconds to set up)#
Apple's dictation is already on your Mac. You just need to turn it on.
Step 1: Open System Settings
Click the Apple menu in the top-left corner, then click System Settings.
Step 2: Go to Keyboard settings
Click Keyboard in the sidebar. Scroll down to the Dictation section.
Step 3: Toggle Dictation on
Click the toggle next to Dictation to turn it on. macOS will ask to confirm — click Enable. On Apple Silicon Macs (M1 and later), it will download a local speech model. This takes 30-60 seconds depending on your connection speed.
Step 4: Choose your shortcut
The default shortcut is pressing Control (^) twice. You can change it by clicking the dropdown next to "Shortcut":
- Fn twice — good if you don't use Fn for anything else
- Control twice — the default, occasionally conflicts with app shortcuts
- Left Command twice — easy to reach
- Right Command twice — less likely to conflict with app shortcuts
Pick one and remember it. You'll use it constantly.
Step 5: Enable auto-punctuation (optional but recommended)
Toggle on Auto-punctuation in the same panel. This inserts commas and periods automatically without you having to say "comma" or "period." It's not perfect — it occasionally adds a period mid-sentence — but it's better than dictating every punctuation mark manually.
That's the entire setup. Click into any text field in any app, press your shortcut, speak, and stop when you're done.
What you get#
Built-in dictation works well for short messages, search queries, and quick Slack replies. On M-series Macs, it runs on-device — nothing leaves your computer.
The hard constraint: it stops listening after roughly 30-60 seconds of continuous speech. For anything longer — an email, a document, a code comment — you'll hit the wall and have to restart. There's no setting to extend this limit; it's how Apple's implementation works.
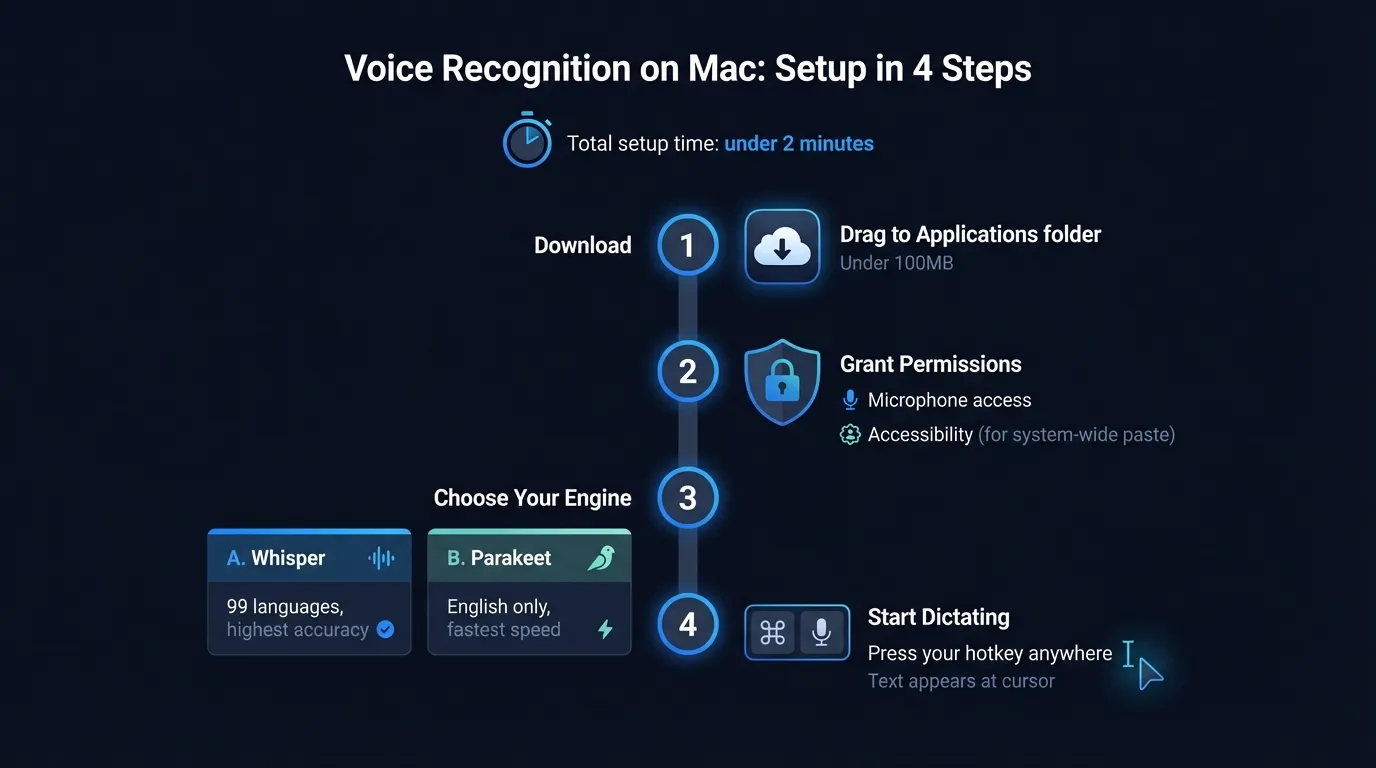
Option 2: Hearsy (under 2 minutes, no time limit)#
If you need to dictate longer than 60 seconds at a stretch, or want AI cleanup of what you dictate, a dedicated app is the better option. Hearsy uses the same local AI approach but without the time limit.
Step 1: Download and install
Download Hearsy and drag it to your Applications folder.
Step 2: Launch and grant permissions
On first launch, Hearsy will ask for two permissions:
- Microphone — to record your voice
- Accessibility — to paste text into other apps by simulating Cmd+V
Both prompts open the correct macOS System Settings panel. Grant them, then return to Hearsy.
Step 3: Choose your speech engine
Hearsy supports two local models:
- Parakeet — English only, under 50ms latency, optimized for Apple Silicon. This is the default. Choose this if you dictate primarily in English and want the fastest possible response.
- Whisper — 99 languages, slightly higher latency (~1-2 seconds to process after you stop speaking), extremely high accuracy. Choose this if you need languages other than English, or dictate technical vocabulary that benefits from Whisper's broader training data.
You can switch between them anytime in Hearsy's settings.
Step 4: Set your hotkey
Hearsy lets you set any key combination as your dictation shortcut. Pick something that doesn't conflict with your other apps. Common choices: Option + Space, Control + Option + D, or a function key if you have one to spare.
Step 5: Start dictating
Press your hotkey in any app, speak, press the hotkey again (or pause — Hearsy detects silence). Your text appears at the cursor position.
That's it. The whole process takes under 2 minutes.
Type at the Speed of Speech
Hearsy turns your voice into text instantly — right on your Mac, with zero cloud dependency.
Built-in vs. Hearsy: when to use each#
| macOS Built-in | Hearsy | |
|---|---|---|
| Setup time | ~90 seconds | ~2 minutes |
| Cost | Free | One-time purchase |
| Max duration | 30-60 seconds | Unlimited |
| Languages | 40+ | 25 (Parakeet) / 99 (Whisper) |
| AI cleanup | No | Optional |
| Latency | Fast | Under 50ms (Parakeet) |
| Privacy | On-device (Apple Silicon) | On-device |
Use built-in dictation if: You only need to dictate short messages and you're on an M-series Mac. It's free, fast, and already installed.
Use Hearsy if: You write emails, documents, or anything longer than a paragraph by voice. The time limit on built-in dictation is too disruptive for real writing sessions.
Three settings that actually matter#
Microphone selection#
Both macOS dictation and Hearsy use whatever microphone is selected in System Settings > Sound > Input. The default is your MacBook's built-in microphone. For noticeably better accuracy, use a headset mic or external USB microphone positioned 6-8 inches from your mouth. Distance consistency matters more than the microphone's price.
If accuracy seems off, check this setting first — it's easy to accidentally leave an external monitor's microphone selected.
Language and dialect#
For macOS built-in dictation: System Settings > Keyboard > Dictation > Language. Add your language or dialect if it's not already there. English (US), English (UK), and English (Australia) have different accent models — pick the one that matches your speech.
For Hearsy with Whisper: Whisper auto-detects language by default. You can pin a specific language in settings if auto-detection gets it wrong on your first few uses.
Custom vocabulary#
macOS built-in dictation doesn't support custom vocabulary — you can't teach it to recognize a product name or technical term.
Whisper handles novel vocabulary better than built-in dictation because of its broader training corpus, but it's still not perfect with highly specific terminology (e.g., internal project codenames, obscure medical terms). If accuracy on specific terms matters for your workflow, test both engines with your actual vocabulary before committing to either.
Tips for better results from the start#
Start in a quiet environment. Background noise degrades accuracy more than any other factor. HVAC, traffic, coffee shop ambience — all of it affects results. A quiet room with your Mac's built-in mic will outperform a noisy room with an expensive microphone.
Speak in complete sentences. Speech models have more context to work with when you finish your thought before pausing. Single words and fragments are harder to transcribe accurately.
Don't try to correct mid-sentence. If you said the wrong word, finish the sentence and fix it after. Stopping mid-thought and backing up confuses timing and often makes the correction worse than the original mistake.
Test in Notes first. The Notes app is the most reliable test environment for Mac dictation — native text input, no browser quirks, no focus issues. If dictation is acting strange in another app, open Notes and dictate a sentence there to confirm your setup is working before investigating the target app.
Frequently asked questions#
How do I enable voice recognition on Mac?#
Open System Settings, click Keyboard, scroll to Dictation, and toggle it on. The default shortcut is Control pressed twice. Works in any text field in any app, with no additional setup required.
What is the shortcut for Mac voice recognition?#
The default is pressing Control (^) twice. You can change it in System Settings > Keyboard > Dictation. Common alternatives are Fn twice or either Command key twice.
Does Mac voice recognition work offline?#
On M1 and later Macs, built-in dictation runs on-device and works without an internet connection. On Intel Macs, audio goes to Apple's servers. Third-party apps like Hearsy also run entirely offline using local models.
How accurate is voice recognition on Mac?#
Built-in dictation is accurate for everyday English. For technical terms or longer sessions, third-party apps using Whisper or Parakeet produce better results — Whisper Large V3 achieves roughly 4.2% word error rate on clean speech.
Is there a time limit for Mac voice recognition?#
Built-in macOS dictation stops after roughly 30-60 seconds of continuous speech. Third-party apps like Hearsy have no time limit.
Ready to Try Voice Dictation?
Hearsy is free to download. No signup, no credit card. Just install and start dictating.
Download Hearsy for MacmacOS 14+ · Apple Silicon · Free tier available
Related Articles
Voice Typing on Mac: How to Type with Your Voice in Any App
9 min read
Voice Typing in Google Docs: The Complete 2026 Guide
10 min read
Voice Control on Mac: Complete Guide to Hands-Free Mac Usage
12 min read
Speech to Text on MacBook: M-Series Performance Guide
8 min read
Speech to Text on Mac: The Complete 2026 Guide
13 min read